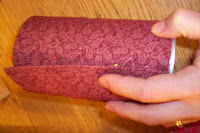
 Fabric wrapped vases make use of our surfeit of empty tin cans waiting to be recycled. The tin vases can hold pens and pencils, lollipops, dry stems, or anything else you want to arrange. I like that they are frugal, functional, and fast to make.
Materials for Easy Quilled Paper Hearts:
- Printer paper scraps
- Scissors
- Liquid glue
- Colored felt, optional
Directions for quilled hearts:
1. Take a longer strip of paper (mine were 11 inches long by 1/4 inch wide) and fold in half. This will form the outer heart.
2. Curl each end with scissors by sliding the paper over the scissor edge at an angle, as you would curling ribbon. Also, cut several pairs of shorter strips of the same width. Curl these shorter strips into fancy "S" shapes. Adjust curved ends to desired shape, insert an "S" shaped strip, and secure heart together with a dot of glue. Hold and allow to dry for a couple of minutes.
3. Arrange shorter curled strips inside the heart shape. Use dots of glue to secure curls in place. You may have to adjust placement slightly to keep outer heart symmetrical. Allow completed hearts to dry for 10 minutes or more.
4. Hang your quilled heart or hearts on a knob, branch, chandelier, or other creative location. If you like, glue the heart lightly to felt for additional color contrast.
Note: We tend to use printer paper that's a bit heavier than photocopy paper. The heavier weight works well for curling with scissors and pencils (though card stock would be too stiff). I do have to "play" with the paper curls to get them tighter in the center and gradually widen until they look right to me. Like snowflakes, no two quilled creations are ever exactly the same.
Materials for Fabric Wrapped Vase:
- Empty tin can
- Fabric piece (large enough to cover can plus an extra 1/2 inch on each side)
- Needle and thread
- Ribbon and buttons to match fabric
- Craft glue or hot glue
- Iron
- Fabric pins
Directions for covering the tin can:
 1. Fold and press hems on 3 edges of the fabric rectangle. Leave one short edge unfolded. The rectangle should be exactly as wide as the height of the can. The unpressed edge will be a little longer than the can's circumference, providing a way to secure the edges together.
2. If using ribbon to decorate, position and attach ribbon(s) by sewing or gluing it to the fabric. Sew buttons, if desired, on the short pressed edge.
3. Wrap fabric around tin can. Lap the pressed short edge over the unfinished short edge. Pin together. Glue or stitch pressed fabric edge in place. Remove pins.


2 comments:
These are too cute! Thanks for sharing the instructions - I would have thought they were much more difficult.
What a pretty idea - I love the quilled hearts on the little branches. So festive.
Post a Comment